If you’ve ever wondered what to do with fallen tree branches, broken tree logs, or discarded vegetable foliage after a fall harvest, then look no further than a hugelkultur vegetable garden.
Hugelkultur is an ancient German and Eastern European practice of growing vegetable garden beds from rotten logs and discarded plant matter to form an elevated fertile mound.
The practice requires minimal maintenance, like no-till gardening but with a few unique twists.
Hugelkultur mounds not only help improve soil quality and increase nutrition levels, but they also add unique topographical variations and microclimates to an otherwise flat and boring garden.
What is Hugelkultur?
Hugelkultur or Hügelkultur is a German word meaning “mound culture” and describes the gardening process of using wood logs, decomposing organic matter, and soil arranged in a tunnel-shaped mound that functions as a raised garden bed.
The Hugelkultur method is popular among permaculture advocates and offers many benefits. Including improved water retention, warmer soil, and increased soil fertility.
It’s also a sustainable way to make use of organic garden trash.
History of Hugelkultur Gardening
Hugelkultur as a practice of growing food from mounds of organic debris and wood has existed in European, Native American, and other cultures around the world for thousands of years.
The agricultural practice taught to early American pilgrims by Native Americans is considered a form of hugelkultur.
However, the term Hugelkultur was first popularized in a German gardening brochure published by Herman Andrä in 1962. Before spreading more widely around the world. [1]
How to build a Hugelkultur raised bed
Hugelkultur bed construction is easy but can be time-consuming.
Start by gathering the necessary materials and prepare the garden layout as follows:
Hugelkultur layers
- The innermost or wood layer is made up of larger tree logs, which slowly decompose to become nutrient-rich humus.
Ensure logs are at least 3-12 inches (7-30 cm) in diameter to allow logs large enough to act as water sponges.
You can chop the logs up to fit your space, but make sure they are not too small or they will decompose too quickly.
Woods to use include hardwood such as alder, apple, beech, birch, maple, sweetgum, ash, acacia, oak, poplar, etc. Hardwoods are ideal as they decompose slowly and supply steady nutrients over time.
Woods to avoid include walnuts, pines, sycamore, red oak, black locust, American elm, and eucalyptus trees, which secrete chemicals that inhibit vegetable and plant growth.
Pine, cedar, spruce, and other high-resin trees make great furniture, but take too long to decompose and should also be avoided.
Willows and other stem-sprouting plants may also regenerate so make sure they are dead before using.
- The second or medium wood layer includes branches and sticks piled on top of the log layer. Insert branches between log spaces and trim if necessary to keep everything compact, tight, and stable.
- The third or green layer includes anything fresh which adds protein and nitrogen: banana peels, carrot tops, soaked coffee filters, clovers, feathers, fruit and vegetable scraps, grass clippings, fresh leaves, twigs, potato skins, seaweed, teabags, fresh plants, etc.
- The fourth, brown, or compost layer includes anything that adds carbon and carbohydrates to the soil: dead branches, vines, and leaves, shredded cardboard and paper, bread, corn cobs and stalks, dryer lint, eggshells, firewood ash, dried flowers, sawdust, fur, grains, hair, hay, nutshells, used paper towels, pine needles and cones, dead plants, straw, wood chips and wood shavings, wool or cotton rags, yard trimmings, etc.
Vermicomposting is also ideal for this layer. Animal waste may contain harmful supplements, so use them with caution.
- The fifth or topsoil layer includes any growing medium/mix that acts as quality topsoil such as fine compost, coir, and loam.
- The sixth or mulching layer includes materials such as wood chips, straws, tree bark, pine needles, or paper to cover the topsoil and prevent erosion. Mulching also prevents weeds and pests.
After gathering materials for the layers, follow the steps below to create a hugelbed:
Hugelkultur garden layout
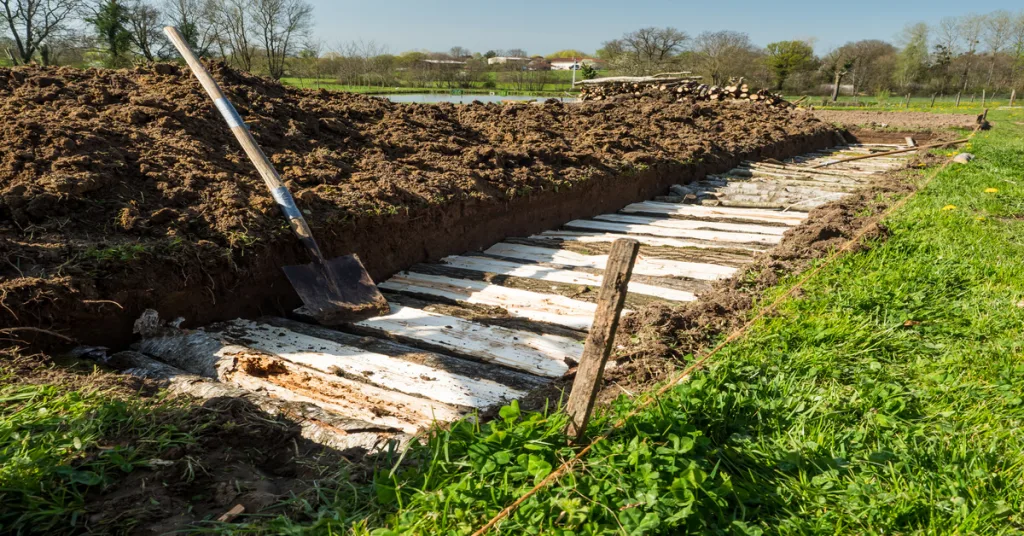
- Measure and mark: Start by measuring and marking a space on the ground at least 6 feet x 5 feet (1.8m x 1.5m). Avoid larger beds, as they can be harder to manage. Remove any grass or turf present.
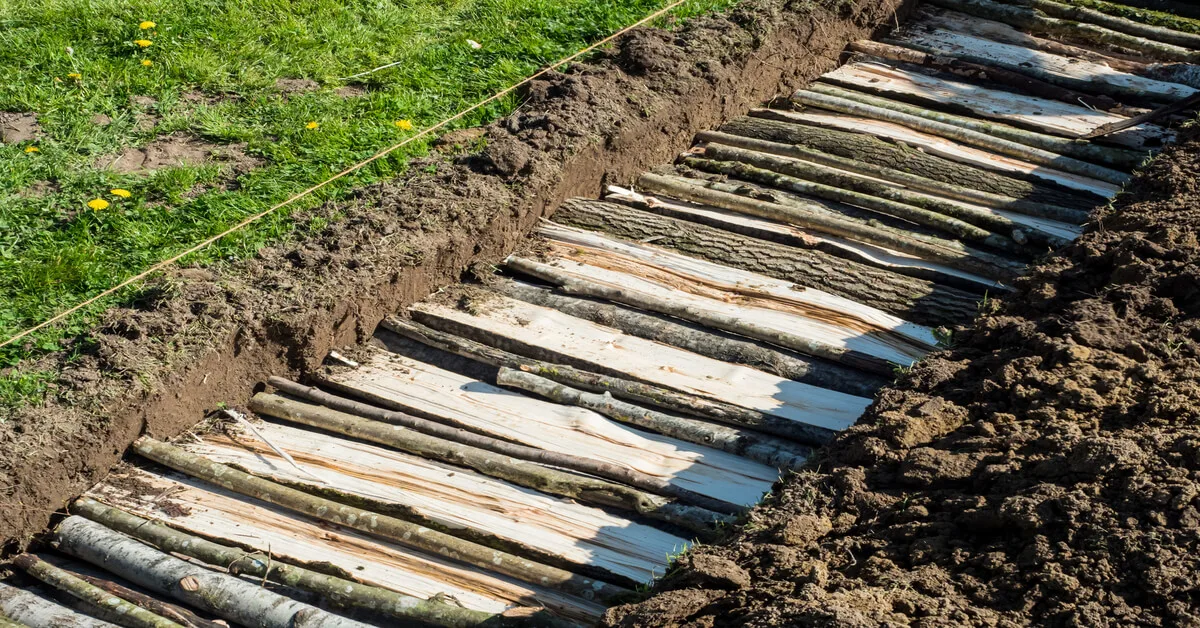
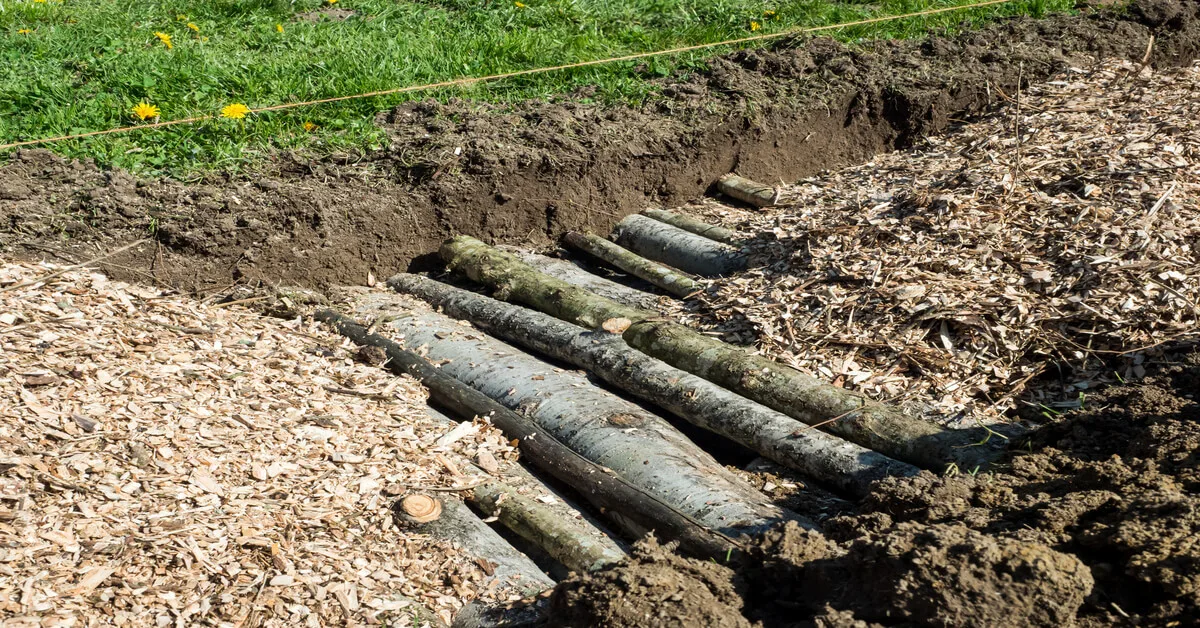
- Dig and cover: Dig a 6-inch deep trench inside the marked rectangle. Flatten out the bottom to ensure an even surface for layering. Cover the sunken bottom floor entirely with flattened cardboard boxes to drown out weeds.
- Arrange logs and branches: Place the large wood logs in the middle of the trench lengthwise (6 feet or 1.8 m). Don’t spread the logs more than 2 feet (0.6 m) wide. Cut the logs if necessary.
Add smaller pieces of deadwood and twigs between the larger ones to ensure the logs are compact and do not shift. The entire wood pile should be no more than 15 inches (0.3 m) tall and fit inside the trench. Water generously.
- Pack in the green layer over the wood layer. Make sure this layer is no thicker than 12 inches (30 cm) and tightly packed. Water generously.
- Add the brown or compost layer on top. Keep this layer about 6 inches (15 cm). Water generously.

- Add the topsoil over the brown layer. Keep this layer to also about 6 inches (15 cm). Firmly tap this layer with the back of a shovel or hoe and water generously.
- Cover the topsoil with a layer of mulch.
If done correctly, you should have a tunnel mound about 3 ft. (1 m) tall.
Keep the slopes of the mound on either side no more than 45 degrees. Make sure to flatten gently and keep everything compact and moist as you layer. [2]
Types of Hugelkultur Gardening
There are many variations on the hugelbed:
- Traditional Hugelbed – Traditional beds can be constructed directly on flat ground with only a 6-inch (15 cm) deep trench.
- Hugelkultur Raised Garden Beds – Raised hugelbeds are similar to traditional raised garden beds, except the mounds are constructed inside a wooden box or frame. A box frame helps retain water, prevent floods, keep soils warm, improve drainage, and enhance the soil.
However, they can be quite expensive or time-consuming to build. Poorly made boxes may also fall apart in heavy rains.
- Sunken Hugelbed – This method involves digging a trench at least 3 feet (1 m) deep and large enough to submerge the hugelbed so that the top soil blends with the surrounding soil. This method is the best for water retention but takes considerable time, especially in compacted soil.
- Hybrid Hugel Beds – Hybrid beds involve burying only half the bed underground and keeping the top layers above the soil level. The smaller trench still draws water while giving the mound extra stability. Although there’s less digging involved, it is still more time-consuming than a traditional bed.
Benefits of Hugelkultur Gardening
Hugelkultur gardening benefits both your garden and the surrounding environment.
Below are some key benefits:
- Water Conservation – Hugelbeds save water. Once constructed, they require minimal artificial watering, as the mounds serve as natural catchments. The logs also become porous over time, acting as a sponge to release water gradually.
- Minimal Maintenance – Regular watering or tilling is often not required, though you may need to weed occasionally.
- Flood Prevention, Wind Deterrence, and Shading – Hugelbeds draw surface water into their depths, where organic matter soaks it all up. This prevents light floods from destroying your gardens. They also help shield nearby plants from wind and provide shade.
- Nutrient Buffet – Hugelbeds are rich in all essential plant nutrients, acting as a buffet ideal for vegetables, fruits, herbs, and other nutrient-demanding crops to feed off.
- Enhance Soil Quality – As the materials in the beds break down, the soil quality is also enhanced. Air pockets created by the wood’s decomposition also add benefits similar to tilling but without damaging microorganisms.
- Diversify a Flat Landscape – Hugelbeds add variation to an otherwise flat garden.
- Sustainable Use of the Land – Hugelkultur is considered an example of permaculture, which is the most natural and sustainable way to use the surrounding land and resources available.
- Microclimates – Hugelbeds create microclimates, allowing you to extend your growing season. The mounds help trap heat and moisture, and different sides of the bed may also exhibit different temperatures and humidity allowing for crop variation.
- Versatility – Hugelbeds allow you to grow crops even in difficult soil such as bedrock, desert, or compacted clay soils.
- Inexpensive and Simple – Most of the materials required are often naturally supplied by the environment or can be purchased quite cheaply. Once hugelbeds are prepared, there’s not much else to do except sit back and wait for the materials to decompose.
Hugelkultur disadvantages
Although hugelbeds offer many benefits, there are also some drawbacks:
- Labor Intensive –Starting a hugelbed can take a few hours or a few days, depending on the size of your hugelbeds and the number of extra helping hands available.
- Not Good in Extreme Weather – In extreme flood conditions, the wood may become buoyant and breach the mound. Heavy rains may also erode the soil, but mulching will help prevent this. Well-prepared mounds should still act as flood protection against small floods.
- Not All Trees Work – Not all trees work for the base of the mound. High-resin and allelopathic woods should be avoided.
- Not All Plants Can Be Planted – Asparagus, corn, cucumbers, spinach, strawberries, and brassicas such as broccoli, cabbage, and cauliflower require stable environments, so should be avoided in the first year.
- Need Lots of Organic Material – For smaller yards, it may be hard to source enough materials to build a large enough mound.
- Slow Process – It may take time for the organic matter to decompose, so the first year’s harvest may not be as bountiful. The second or third year will be more abundant.
Hugelkultur Mistakes (dos and don’ts)
A well-built hugelbed is better than several poorly constructed ones. Follow the below to avoid making common mistakes:
Dos:
- Arrange plants according to their moisture and sun needs. The lower parts of the mound will have more moisture than the upper parts, perfect for water-hungry plants. Plants requiring full sun should be planted on the south-, east-, or west-facing slope.
- Be patient during the first year as the insides of the hugelbeds take time to decompose and age. You can still plant immediately after constructing a bed, but start the beds in the fall to allow for winter decomposition.
- Add a touch-up. Although they require minimal maintenance, a light touch-up of fresh topsoil can help combat erosion. Cover any exposed wood with brown or green organic matter and topsoil. Hugelbeds will sink over time as the woods decompose.
- Water generously when constructing. Hugelbeds act as natural water reservoirs, mimicking the forest, so generous watering between layers will help them get a head start. Weekly waterings, similar to a regular garden bed, should also keep soils moist and cool to the touch.
- Build the beds away from your house. Beds that are poorly constructed (not compact enough) may attract pests such as ants and termites.
Don’ts:
- Avoid less-than-ideal locations such as beneath a tree canopy or shaded areas. Shaded hugelbeds have difficulty developing microclimates and getting the necessary sunlight.
- Don’t leave gaps between the layers, as heavy rains may cause the beds to collapse. Make sure every layer is compact and stable before moving to the next.
- Don’t make the beds too large. Keep beds narrow. Wider beds may be hard to reach, requiring you to step onto the delicate mounds.
- Avoid chemically treated and pest-ridden wood as it decomposes slowly and may contain undesirable pests and chemicals.
- Avoid fresh trees that can revive and grow again.
- Avoid using logs that are too small (less than 3 inches or 8 cm in diameter) or are too chopped up, as these may decompose too quickly and won’t hold enough water.
- Avoid sandy soils as they do not retain water well.
- Avoid overcrowding with too many beds. Make sure you have enough space for a wheelbarrow to pass through between beds. Too many beds may also deplete all the available organic matter.
References:
[1] Chalker-Scott, Linda (August 2017). Hugelkultur: What is it, and should it be used in home gardens? Washington State University Extension. Retrieved 8 July 2018. http://pubs.cahnrs.wsu.edu/publications/wp-content/uploads/sites/2/publications/FS283E.pdf.
[2] Hall, S. (2022). Hugelkultur Gardening: Using Ancient Wisdom and Modern Soil Science to Create an Organic, No-Till Vegetable Garden (Permaculture Mini-Book). Independently published.